TrackTik's Onsite License feature allows users to access the TrackTik system from a computer's browser. Onsite licensing is helpful for users who do not need to complete checkpoint tours but still need to clock in and out, file reports, or use the Visitor Management module.
Requirement: To use the Onsite License for reporting and visitor management, the Scheduling and Timekeeping module must be active. While employees can log in to the Staff Portal without it, the specific Onsite tools (Site Access tile) will not appear or function unless a scheduling environment is detected.
Note: Some features in this section are available in the staff portal without activating an Onsite license.
Onsite License Activation
Follow these steps to activate the Onsite license feature. From the Security and Patrol tab, activate the Onsite License feature.
Go to:
Site > Security and Patrol tab > Onsite Features > Onsite License
Users will now access the site with the same credentials to access TrackTik on a mobile device.
Clock in Using an Onsite License
Articles where "Onsite" appears in the heading that describes Onsite license functionality require an Onsite license to be usable.
Users utilizing the Onsite license can clock in and out for shifts and breaks like a mobile device.
You can follow the steps below to clock in using the Onsite license.
From the Onsite tile, select the Site Access option.
The users will see the list of sites to which they are assigned.
Click the Clock In button to clock into the site.
Confirm that you would like to clock in.
The system will ensure you are clocking in at your scheduled site. If you try to clock in at a different location than where you are scheduled, you will get an error message telling you you are scheduled at a different location.
If the Scheduling module is active but the employee is not on the calendar, the system will generate an 'Unplanned Shift.' However, if the Scheduling module is disabled entirely, the Onsite portal will remain inactive for that site. Consequently, users at sites without the Scheduling module enabled will not be able to utilize these Onsite features
Once a user has clocked into a site, they can clock out, start a break, or leave the site. The user can also write reports using the Onsite license.
Scheduled Tours
View a list of scheduled tours and when the tours were last performed.
You can view the following:
- The scheduled time of the tour.
- The name of the tour.
- When the tour was last performed.
Site Contacts
Under the site contacts tab, you will find a list of contacts associated with the site.
- Click the Site Contacts tab to see and manage the list of site contacts.
- Name: The name of the contact.
- Title: The job title of the contact.
- Phone: The phone number of the contact.
- Email: The email address of the contact.
- Click the edit button to edit the contact.
- Click the Create Contact button to create a new site contact.
For more information on creating contacts, please see this article.
Client Portal Access
You can create, edit, view, and delete access for your clients. A multi-site has a list of sub-sites attached.
- Click on the portal access tab.
- The client's first and last name.
- The client's email address.
- The client's phone number, if any.
- Last log in.
- View a list of sub-sites to which the client has access.
- View the client's access level.
- Edit the client portal access.
Create a Client Portal access, click the Create a Client Access button, and fill out the fields.
- First Name: The first name of the client.
- Last Name: The last name of the client.
- Picture: Add an optional photo of the client.
- Phone: The client's phone number. Check the box to enable SMS messages to a cell phone number.
- Email: The client's email address.
- Choose a Password: Enter the desired customer password.
- Confirm Password: Repeat the password.
- Force to Change the Password: Require a password change.
- Permissions: Select a role for the client.
- Status: Grant or revoke client access.
Once the information has been entered, click Save.
Write a Report Using the Onsite License
Follow the steps below to write a report using the Onsite license.
In the Create Report tab, you can select the report template you would like to complete.
Fill out the report fields.
Click the Send Report button.
Note: Like all other reports, any reports filled out this way will be accessible under the Operations Reports tab.
Manager Dashboard
The manager dashboard is a staff-level set of roles and permissions that allows supervisors to manage only the sites and employees to which they are assigned.
These permissions include:
General Access: This option gives the user access to the Manager Dashboard when logged in with an Onsite license.
View the Map and Track Panels: This gives the user access to the Map and Track Panel on the dashboard.
View Dashboard Reports: This option gives access to the reports dashboard within the site.
View The Tours: This provides the user access to the tours dashboard from within the site.
View The Patrol Dashboard Checkpoint Section: This should be checked to view checkpoints and tours. Un-checking this option hides the Patrol Tours menu completely.
View The Patrol Dashboard Recording Section: View watch mode recordings created by users in the field.
View The Exceptions Tab: This is a list of system exceptions triggered by specific events such as missed shifts, inactive mobile users, late Lone Worker check-ins, and panic button triggers.
Broadcast Messages and Use The Remote Tasks: This option grants users access to remote tasks from the dashboard.
Schedules
Managers and supervisors can use an Onsite license to prepare a schedule from within a site. This allows them to prepare schedules only for the sites and employees they are in charge of.
You can go to the Schedules tab within the site.
Click the Prepare button to prepare the schedule.
View Your Schedule
Click the Schedule tile to view your schedule in an Onsite license.
- Scroll forward or backward using the arrow buttons.
- Filter by month, week, or day by clicking the appropriate buttons.
Preparing a schedule using an Onsite license is the same as preparing any other schedule. Please look at the Scheduling for step-by-step instructions and more information on scheduling processes.
Employee Management
With the correct permissions, managers, and supervisors can manage the employees assigned to the sites. They can create and modify employees, terminate employees, and reset passwords. Accessible features may vary according to permission level.
Follow the steps below to manage employees using an Onsite license.
Create an Employee
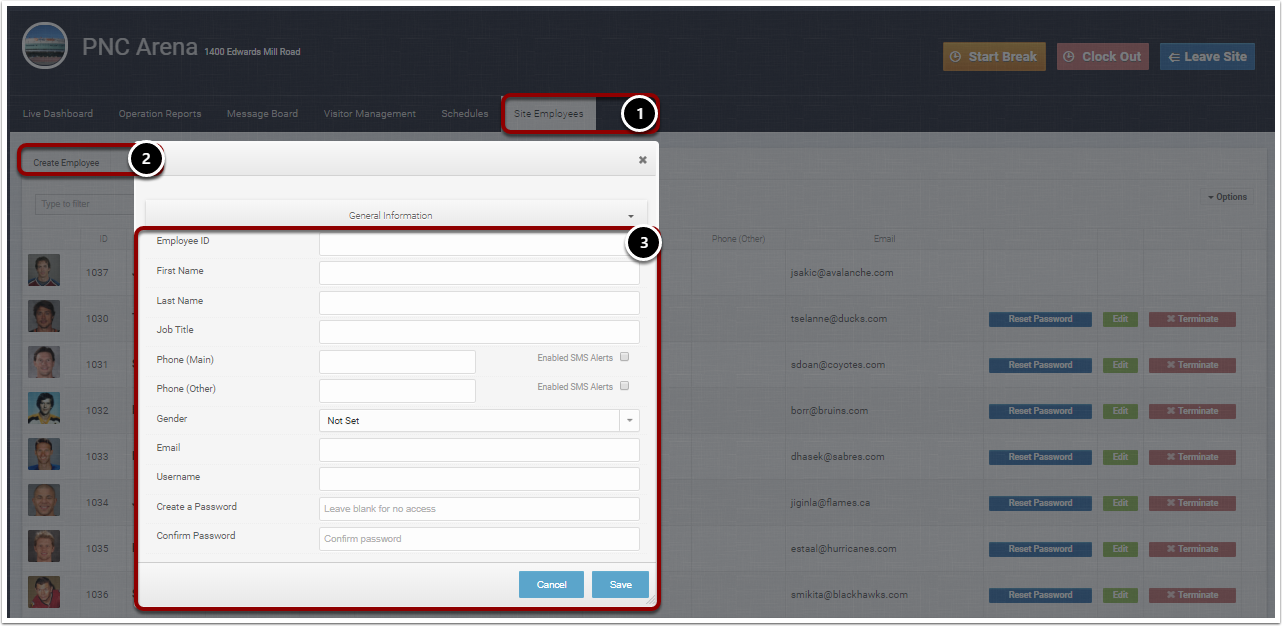
- Click the Site Employees tab.
- Click Create Employee.
- Fill out the information.
- Employee ID: The unique ID of the employee.
- First Name: The employee's first name.
- Last Name: The employee's last name.
- Job Title: The employee's job title.
- Phone (Main): The main phone number of the employee.
- Phone (Other): The employee's other or secondary phone number.
- Enabled SMS Alerts: Check these boxes to allow text messages to the employee's phone numbers.
- Gender: Select the employee's gender.
- Email: Enter the employee's email address. Email is one of the ways an employee can access the system.
- User Name: Enter an employee's user name. This is another way the employee can access the system.
- Create a Password: This will be the employee's password for the system.
- Confirm Password: Repeat the password already entered.
Click on the Other Fields button to fill out more information.
Address: Fill in the employee's address.
Roles and Permissions: Select an employee role.
Other Fields: Fill out additional information, such as the employee's birthday, employment date, comments, and tags.
Reset a Password
- Select an employee from the Employee List and click the Reset Password button.
- Enter a new password.
- Confirm the new password.
- Click Save.
Modify an Employee
- Select an employee from the Employee List and click the Edit button.
- Modify the information.
- Click Save.
Terminate an Employee
- Select an employee from the Employee List and click the Terminate button.
- Select the employee's Last Day of Work.
- Enter any comments.
- Click the Save button.